Mastering the Basics of PCR: A Comprehensive Guide to Polymerase Chain Reaction Protocols
Introduction
Polymerase Chain Reaction (PCR) is an essential tool in molecular biology, enabling the amplification of specific DNA sequences. This course provides a step-by-step guide to PCR protocols, offering a detailed explanation of the process, troubleshooting strategies, and practical applications in research, diagnostics, and beyond.
Course Objectives
By the end of this course, you will:
Understand the principles of PCR and its components.
Perform PCR experiments confidently using detailed protocols.
Troubleshoot common PCR challenges to ensure successful results.
Recognize the wide-ranging applications of PCR in science and industry.
Course Outline
Module 1: Understanding PCR Fundamentals
What is PCR?
PCR is a technique used to amplify specific DNA sequences, enabling the study of genetic material in detail. It has revolutionized molecular biology, diagnostics, and genetic research.Key Components of PCR
Template DNA: The DNA that contains the target sequence to be amplified. Ensure high purity to avoid contaminants that may inhibit the reaction.
Primers: Short DNA sequences designed to flank the target region. Primer design is crucial for specificity and efficiency.
Taq DNA Polymerase: A heat-stable enzyme responsible for synthesizing new DNA strands.
Nucleotides (dNTPs): The building blocks of DNA, required for the synthesis of new strands.
Reaction Buffer: Maintains optimal pH and provides essential ions (e.g., Mg2+) for enzyme activity.
The PCR Cycle
Denaturation (95°C): The double-stranded DNA is separated into single strands.
Annealing (50–65°C): Primers bind to their complementary sequences. The temperature depends on the melting temperature (Tm) of the primers.
Extension (72°C): Taq polymerase synthesizes new DNA strands by adding dNTPs to the primers.
Module 2: PCR Protocols Step-by-Step
1. Preparing the Reaction Mix
Step-by-Step Breakdown
1. Prepare a Master Mix:
Combine all common components (buffer, dNTPs, Taq polymerase, and nuclease-free water) in a single tube to minimize pipetting errors.
2. Add Template DNA and Primers:
Add the specific template DNA and primers to individual reaction tubes. The volume of template DNA should not exceed 10% of the total reaction volume.
Component Volumes for a Standard 25 µL Reaction:
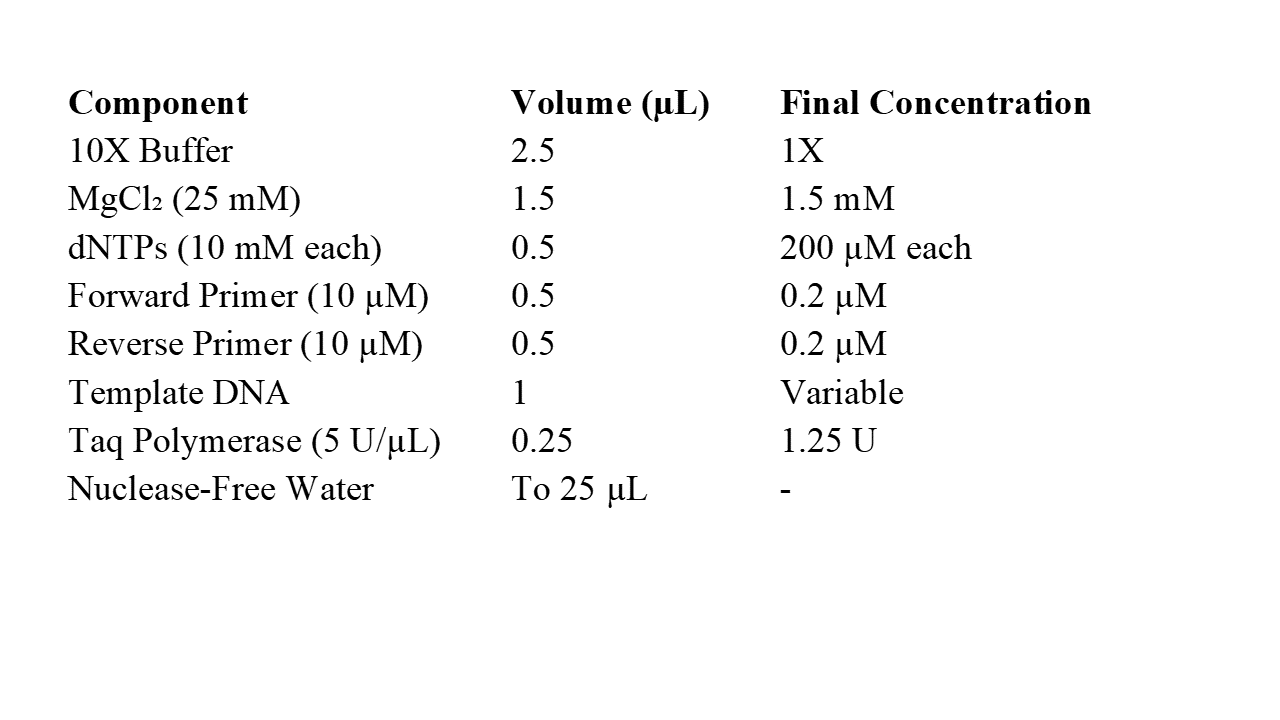
Tips for Success:
Always use nuclease-free water to avoid DNA degradation.
Work in a sterile environment to prevent contamination.
Keep all components on ice during preparation.
2. Setting Up the Thermal Cycler
Programming the Thermal Cycler:
Input the PCR program according to the target DNA size and primers’ melting temperature.
Example PCR Program for a 500-bp DNA Fragment:
· Initial Denaturation: 95°C for 2 minutes (1 Cycle)
· Denaturation: 95°C for 30 seconds (30 Cycles)
· Annealing: 55°C for 30 seconds (30 Cycles)
· Extension: 72°C for 1 minute (30 Cycles)
· Final Extension: 72°C for 5 minutes (1 Cycle)
· Hold: 4°C
Placing Samples:
Load the reaction tubes into the thermal cycler and ensure the lids are tightly sealed to prevent evaporation.
3. Performing PCR and Post-Reaction Cleanup
Running PCR:
Once the thermal cycler is programmed, start the run. The typical PCR process takes 1–2 hours, depending on the number of cycles and step durations.
Gel Electrophoresis for Analysis:
1. Prepare the Gel:
§ Use a 1% agarose gel for most PCR products. Dissolve agarose in TAE/TBE buffer, add ethidium bromide or a safe dye, and pour the gel into a casting tray with a comb.
2. Load PCR Products:
§ Mix 5 µL of the PCR product with loading dye and pipette it into the gel wells. Include a DNA ladder for size reference.
3. Run the Gel:
§ Run the gel at 100–120 volts until the dye front has migrated sufficiently.
4. Visualize Results:
§ Place the gel under a UV transilluminator or a gel imaging system to check for amplification.
Module 3: Troubleshooting PCR Experiments
Common Issues and Fixes
No Amplification:
Verify template DNA quality.
Check primer design for compatibility with the target sequence.
Ensure the thermal cycler is programmed correctly.
Non-Specific Amplification:
Increase annealing temperature or adjust primer concentration.
Use hot-start Taq polymerase to minimize non-specific binding.
Low Yield:
Ensure all reagents are fresh and properly stored.
Verify the Mg²⁺ concentration in the buffer.
Best Practices:
Include a positive control to confirm successful amplification.
Use a negative control (no template DNA) to detect contamination.
Module 4: Applications of PCR
Medical Diagnostics: Detect genetic mutations, infectious pathogens, and more.
Forensic Science: DNA fingerprinting and criminal investigations.
Research: Gene cloning, sequencing, and expression studies.
Environmental Science: Detecting microbial populations in soil and water.
Conclusion
This self-guided course equips users with the practical skills and theoretical knowledge to successfully perform PCR experiments. With detailed protocols, troubleshooting strategies, and real-world applications, you are ready to confidently explore the vast potential of PCR in molecular biology.
Dive into the world of molecular biology with BOLG and unlock your potential!